Pages

Sunday, December 28, 2014

Painting the kitchen cabinets - part 1

Two disclaimers right up front:
  1. I know I never posted "after" pictures of the backyard. (Heck, I'm not sure I posted all of the "befores"!) I've been meaning to...I will eventually! It's not a total transformation, but it's definitely a step in the right direction. 
  2. I won't be posting any pictures this time either! You're just going to have to read words. 
So, as the post title indicates, I decided to paint my kitchen cabinets! The driving factor was the ability to take this entire week and next off. Originally I thought that would be plenty of time, and now I'm fearful it will bleed into the following week/weekend or more. 

I've been reading up on this for 4-evah; since we bought the house. Pinterest is an amazing resource!! I read up on Chalk paints vs latex paints vs oil paints, different prep techniques (deglossers, sanders, the no-prep prep). I've studied at least 10 different step-by-steps on various home DIY websites, and well as some pro sites. I felt supremely confident two days ago. 

Not so much now. I attribute this in large part to my attempts at making a detailed plan. I wrote out explicit steps, bullets and sub-bullets. I left nothing assumed or undocumented. The problem was/is that I had an overly ambitious (aka delusional) timetable. I've never prepped a kitchen for painting before, and I'm now suspecting that my estimates for prepping (sanding, taping, deglossing, and generally everything you do before you ever pick up a brush) were grossly inaccurate. 

I started the project around 5pm yesterday, and my plan had me priming cabinet doors by the end of the night. It's now the end of day 2 (my first full-ish day, minus a previously scheduled hair appt and present-opening with the boys), and I still haven't started painting!

But I/we have accomplished a lot: Sanding cabinet boxes, doors removed and drilled for knobs, kitchen about 80% taped & draped. Tomorrow I'll post a picture of my innovative tape & drape solution - it's pretty impressive if I do say so myself (and I do).

What's left before commencing to paint: degrease interior cabinets, tape bottom slide out shelves, tape/cover floor, sand doors & drawers. I'm guessing all that will take another 4 hours?

Two unfortunate events so far:

  1. Yesterday when I went to buy paint, I told the Benjamin Moore guy I needed two gallons of Gettysburg Gray, when what I really wanted was Galveston Gray. He tried to get the paint color as close to Galveston Gray as possible, but it's ultimately a little browner than I'd prefer. (Sorry mom!) I hope I like it - at $49 a can I wasn't in a position to just write it off.
  2. Ryan accidentally dropped a door, and it came apart. However, this one actually turned into a positive (we think). We decided to paint the interiors of the cabinets for that door and its companion, and then order doors with glass instead. For a while there won't be any doors, but that's two less doors to paint! We also decided to leave the doors off the cabinets above the microwave space and just have open shelving. Two more doors off the painting list!! That's a total of 4 fewer doors to paint if you're keeping score at home. 
I'm nervous about painting because the sprayer freaks me out, but hopefully by my next post it'll be smooth sailing, er, painting. 

Saturday, October 18, 2014

Backyard progress - bed #1

That's a terrible post title but I've had these pictures for weeks so I just need to get them up because this weekend is the AFTER!!

Remember my angry Haikus about the Yahoo! Weather app? That was the day I was out in the backyard, working on the area to the left of the newest plantings just off the patio.

I was digging all the &#*@! rocks out of the bed up next to the house for about 3 hours. It's a tiny, tiny bed so I thought I was starting on the easy part. I quickly came to realize that the previous owners had used the rocks as mulch but hadn't put down any kind of cloth and also hosted Riverdance shows on that patch of earth, so the rocks were firmly pressed in. Digging them out was awful.

The Before. If this were a picture of the BEFORE Before you'd see a giant, ugly holly there too.

See all those #!$@% rocks?!?! I just piled them all against the bottom edge of the house. I'm sure there's a reason that's a bad idea.
The after Before.

Below you see a (mostly) clean bed ready for plants.
The before After...

And now, plants! Ta-da!!


For those of you keeping score at home, those are the Valentine roses I pulled up from the beds in the front. And now, almost 2 weeks later, they look even better because they're SO happy!

To the right (against the fence) is a Pennisetum 'Purple Prince'. It's likely going to get too big for that spot, but I love that plant.

To the left is a little peach tree called a Patio Peach! I don't know if it will ever produce fruit, but the leaves are a nice dark color rather than the typical green, so it will look lovely regardless if I don't kill it. And yes, that's the tag hanging off of it. I'm the Minnie Pearl of gardeners.

Today's project is laying down that brick edging I talked about! The bricks are all piled in the driveway, so wish me luck! 

Wednesday, October 8, 2014

What he said

The other day I was listening to an NPR interview with David Fincher, Director of the movie 'Gone Girl'.

He was asked a question about his films, and [I'm paraphrasing here] what percentage he'd redo if he could.

His answer captures exactly my gardening style, and unfortunately I'm to butcher this quote because I can't find the transcript anywhere: "95% of them. When I see it all strung together from beginning to end, now I know what it is."

Saturday, September 27, 2014

Haiku for the Yahoo! Weather App

Yahoo! Weather app
Stopped clocks are right more than you
Weather app you suck

Yahoo! Weather app
Uninstalling is too good
For this sucky app

Saturday, September 20, 2014

I had to start somewhere

I got tired of looking out the french doors to the back patio and seeing dirt...and fence. I may not know what I want to do with the rest of the back, but I was suddenly inspired to experiment in the one area I can't avoid looking at. I'm pleased with it:


I love this Crepe Myrtle - I think maybe it's Natchez? It has beautiful pendulous branches with white flowers. I'm going to plant another one parallel to it on the right side of the garden. Symmetry!


More angles:


I got it all in the ground last Sunday, just days before the great deluge. These pictures are post-deluge, which is why you don't see a lot of leaves on the ground: they're all washed up against the roots of the big oak tree. I plan to use them as a mulch for a bit, and then when I get real mulch just leave them under it to decompose. [I read things that say not to do that because it acidifies the soil, and messes with the pH too much for native plants like Crepe Myrtles? Argh, I don't know what the right answer is. To quote Barbie circa 1992: "Math is hard. Let's go shopping."]

Here's the outline to the left:

If you squint, the yard already looks better with the wood outline alone. Structure!


I laid the outline of the bed with some 2x4s left over from the patio overhang repairs. I plan to do it with brick, like danger garden! [I asked her via email about the edging and she very kindly shared the info. Then I told her I was going to Single White Female her garden, which in retrospect might freak a person out a little. Nothing in HER garden will die by my hands, so the similarity pretty much ends with me being a big fat copycat.]

I planted:

  • 2 of some elephant ear (dang it!!)
  • 6 Varigated Giant Liriope
  • 3 Cast Iron plant
  • 2 Giant Apostle Iris 'Regina'
  • 3 Canna (the 'Blueberry Sparkler' canna I pulled up from the front beds)
I know the canna will never bloom there but that's okay, I just want them for the darker foliage. The only ones likely to survive winter/come back are the liriope and Cast Iron plants, but it's worth rolling the dice.

Yes, I'm avoiding doing anything substantive with the ugliness of that entire left side of the garden yard. And the right side, for that matter. I just needed something back there to give me hope for the future.

Monday, September 8, 2014

My name is Wendy, and I'm an over-planter

It's 75% strategery, and 25% a really poor sense of dimensions. Or I might have that backwards.

That reminds me of a joke: why are women so bad a math? Punchline: because they're always being told that this [holds up hands spaced approximately 3 inches apart] is 6 inches.

I really do read the tags and carefully consider the size of each plant before I dig the hole. My issue is that I consider the size of each plant individually, rather than looking for overlapping diameters of growth. (I'm sure there's a gardenery technical term for that.)

You'd think an awareness of this would empower me with an ability to fix it, but I've come to the conclusion that it's part of my process. I will plant things too close to each other, let them fill in, and then decide what stays and what goes.

I love an exuberant garden and have an inability to leave empty spaces empty. It isn't because I don't appreciate the value of empty space, it's just because there are too many awesome plants.

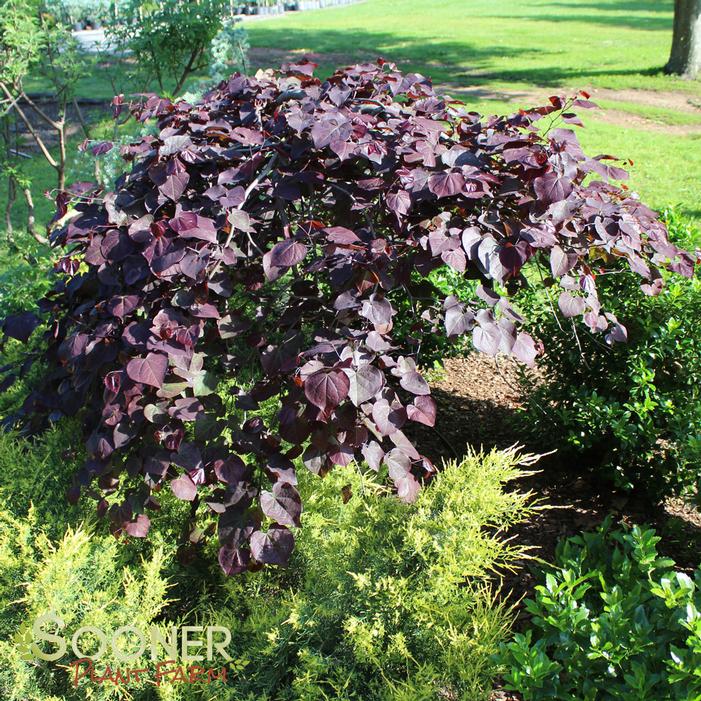
Which brings me to today's garden activities. I've been trying to incorporate more dark foliage into my front bed. It gives a garden some gravitas and maturity, I think. To that end, I ordered a small tree called 'Ruby Falls' Weeping Redbud. Here's the picture from the online nursery:
Sooner Plant Farm, Ruby Falls Weeping Redbud
I know our neighbors keep commenting (positively) that my makeover has really opened up the front of the house, but I felt some height variation was in order too. So I planted this baby right here:


This necessitated moving those blue grasses around a bit, which needed to happen anyway. I also planted another 'Lafter' rose in that area (to replace the one that didn't make it back in August), and then I planted some Salvia guaranitica 'black and blue' on the edges next to the walkway.

I'm the least confident in the Salvia planting, because:

  1. That area gets a lot of sun, and my experience with those is that they like filtered sunlight
  2. They're ultimately too close to the rose
But right now everything looks lovely.

I planted another 'Lafter' rose (for a total of 3) over on the far right end, to replace the Atlas blue palm that died. (In my defense, I watered it the same as I did the Bismark Palm which is doing GREAT, so the blue palm can suck it.)

That picture isn't worth posting because the light was awful and my iPhone didn't do it justice, but I'll take a decent shot and post it just for record keeping. Rest assured, it's all likely too close together.

I have grand plans for that side of the house: I'm going to have that stupid giant green shrubbery pulled up and plant a Castor plant! I don't know how big it will get before winter kills it (it's an annual), but it will be a fun experiment. Let's pretend it will look like this:
Photo: Purdue University, Purdue Plant and Pest Diagnostic Laboratory

I planted another one here, just for kicks:
Forgive the ugly shadows, it was early afternoon


I moved the Agave 'Live Wires' closer to the walkway, but that thing will still overtake them if it gets as big as pictures indicate. Luckily it's easily killed if I don't like it.

THIS necessitated moving the poor germander 'Azure' yet again, but I think it's now in a permanent home. I moved another in that far right bed. I also moved the Saliva clevelandii, and I worry it will punish me for that. (I moved a lot of plants today, come to think of it....)

Ironically, my primary goal today was to plant all the irises I ordered from Schreiner's Iris Gardens. Of the 18 I ordered, I got a whopping 6 in the ground before I ran out of dirt. (I always underestimate the amount of dirt or mulch I'll need. See math joke above.)

Monday, September 1, 2014