Pages

Wednesday, December 31, 2014

Painting the kitchen cabinets - highs and lows

I had no idea that painting one's kitchen cabinets would be such an emotional roller coaster. It's hard to know where to start, so I'll just go in chronological order. [This might become less coherent as the post progresses, because I'm chugging wine like a sorority girl.]

I finally got an actual coat of paint on the lower cabinet boxes! I was profoundly nervous: even though I've worked with Benjamin Moore Advance paint before, I'd only sprayed it with my Graco X5 Paint Sprayer [foreshadowing]. I'd never applied it with a brush or roller, and I'd read horror stories on other blogs about it sagging and dripping.

I mentally debated Sherwin Williams Pro Classic Alkyd vs. Benjamin Moore Advance for weeks, and finally ended up going with Advance because of one lousy review a supposed pro-painter left on the Sherwin Williams website about Pro Classic. (Kind of arbitrary when you consider you can find a ton of negative reviews on Advance, see paragraph immediately above.) It really does apply level beautifully; I'm totally sold on it now. I can see how sagging or dripping might happen if you were loading the brush and slopping it on the surface, but it was easily managed. [Forewarned is forearmed? Is forearmed a thing? That doesn't seem right. The wine might be kicking in.]

I started off with a mohair roller the guy at the Benjamin Moore paint store recommended, but ultimately went back to my Home Depot foam roller. All you need to know the mohair roller is the HAIR part. I kept seeing little fibers in the paint. Pissed me off. Luckily on my last/most recent trip to Home Depot I bought a metric butt-ton of those, in a rare demonstration of proactive purchasing. I'm ready.

That was the first high, immediately followed by relief that I like the color. [You might recall that the paint dude tried valiantly to match it to Galveston Gray after I had a dyslexic moment.] It's a warm gray and I think it will look great with White Dove on the top cabinets.

My first low was encountered when I attempted to use the spray cans I purchased from the BM paint store. I anticipated using them on the larger flat surfaces, as well as the detail-heavy side of the cabinets next to the dining area. [Someday I plan to demolish that side entirely and create bench seating, but for now I've got to address it.] None of them worked. It was bizarre: I saw the guy fill them, and I saw him test them. I shook them for nearly 3 minutes each, and tried 4 separate cans, but no love: it just oozed a clear or white-ish fluid. I had to drive back to the store, where they also tested it and verified I wasn't an idiot, and gave me my money back. While it's nice having $140 back in my pocket (10 cans at $12/can), I expected to save time with those, so it does come at a cost.

Backstory for low #2: Gettysburg Gray, my accidental choice, is a very green gray:
(Heavy on the green, light on the gray. This swatch image doesn't do it justice.)
As mentioned numerous times, the paint store dude did his level-best to get it as close to Galveston Gray as possible:
 
Unfortunately you can't take color out, you can only add or offset. So...Leo (Ryan's 8 year old) walks into the kitchen after I've finished. The first words out of his mouth? "That looks like a gross green gray."

Needless to say, I beat him to death with a paint brush. KIDDING. I ignored him, because I like the *#($%@! color. [Emphasis on the $ part of that expletive.]

Earlier in the day I had gotten primer coats 1 and 2 on the upper cabinet doors out in the garage. Since they'd had time to dry while we ate New Year's dinner, I went out and did the finish sanding (you know, 220 grit) on both the doors and the drawers, vacuumed them, and then wiped them down with Tack Cloth.

I moved the drawers inside because my hopes of spray painting them had been dashed, but I still had my Graco X5 sprayer and was Hell-bent on getting one coat of White Dove on the uppers tonight.

And that's where the wheels completely fell off.

That GD sprayer caused me profound anxiety when I was spraying the baseboards back in February, but I felt like we needed a fresh start and went into this with a positive attitude.

I hate that effing thing. It now lives in the trash.

I read and re-read the instructions, flushed then primed the tubing with paint. When I turned it to SPRAY, it spurted paint up in the air at a significant trajectory. [I will have to re-sand some of the bottom cabinet doors, dammit. They were in a box in the corner of the garage and yeah, it went that far.] I then re-checked the instructions, realized the Quick Start Guide left out a pretty critical step [bastards], and tried to spray again.

Paint then started oozing out of a connection on the hose that I didn't even touch! Ryan came out while I was in the throes of oozing paint cleanup. He tried to help me tighten the connections, but it only got messier and leaky-er. He stepped in a big puddle of paint, and he doesn't own painting shoes like I do so that was not cool.

Then the damn cat ran into the garage because he's an opportunistic jerk. I was terrified I'd be cleaning up paint cat paw prints for the rest of our lives so, I proceeded to curse a blue streak and chase him. [FYI that never, ever helps.]

I finally realized that if I didn't clean up the giant puddles of paint he'd inevitably run through them, so I abandoned chasing him in favor of cleaning.

Ryan collected Ollie and beat him on my behalf, and I cleaned paint off the garage floor as much as I could. Then I put the Graco X5 in the trash. I will hand paint/foam roll coat 1 the backs of the doors tomorrow.

[Look, we didn't beat the damn cat. He's just picking up on my stress and the boys being hyper and Ryan's mom being here. He's quite the empath. But I still hated him a little in that moment.]

So I'm slightly behind schedule. HAHAHAHAHA!

I'm way behind schedule. Whatever. It'll get done when it gets done. And it will be awesome in spite of everything.

HAPPY NEW YEAR!!

Tuesday, December 30, 2014

Painting the kitchen cabinets - part Infinity

Posting 'part x', is misleading so I'm abandoning it in favor of snark. This project will never, ever be over. I don't regret taking it on persay, but wow, it's brutal. I hate everyone on the internet that finished it in 48 hours, or even 10 days. I am largely doing it alone, but this still seems to be taking an inordinate amount of time.

Yesterday's accomplishments:
  • Applied primer coat 2 on the cabinet boxes.
  • Sanded doors and drawers
  • Sanded cabinet boxes (lightly with 220)
Yep, that's it. And yet I was busy for 9 solid hours JUST DOING THAT. Actually I think it's got to be longer than that, because I started around 9am, stopped for Leo's birthday dinner around 7pm, and then started again around 10pm and worked until midnight. So what's that, 12 hours? It's been like this every day. It takes between 6-7 hours just to paint the cabinet boxes.

I temporarily consoled myself by calculating how little money I'd spent (~$350) compared to what this would cost from a professional (~$1800-2200, possibly more). But then I remembered that I took a week of PTO for this project. That narrows the gap a bit, and every piddling trip to Home Depot (for the supplies I seem to be perpetually one short of) chips away at it even further. [I think I'm mixing metaphors but that's what 48 hours of primer fumes will do to your brain.]

I wish I could somehow post the entire 4-page task list that I wrote out, because it's hilarious. Here's what I'm supposed to be doing tomorrow, day 6:
  • Spray paint coat 2 on lower cabinet doors (backs) 
  • Spray paint coat 2 on drawer fronts  
  • Spray paint hardware
  • Kill ~ 12 hrs 
  • Spray paint coat 3 on lower cabinet doors (backs)
"Spray paint coat 2 on lower cabinet doors"...."Kill 12 hours"...I'm a comedian.

Last night I lay awake in bed until 5am just freaking out. I finally made the decision that if I'm going to miss my self-imposed deadline of finishing by this Sunday, I'm going to miss it by a mile. That means I'm going back to my original plan of top cabinets being white, bottom cabinets being greige. If I'm lucky, I'll finish painting all the top cabinet boxes and doors, and the bottom boxes (only) by Sunday. Then I'll paint the bottom cabinet doors and drawers next weekend (starting Thursday evening and finishing Sunday).

Today I started at 9am, dry-wiping the cabinet doors and drawers, vacuuming off each one, then wiping them all down with a damp rag. After this lunch/coffee break I'll go back out and de-grease, and then spray coat 1 of primer on them. In an hour I'll spray the 2nd coat, and then maybe I'll actually get a coat of paint on tonight. But more likely, I predict running out of spray primer and making another trip to Home Depot. If I don't run out of primer, I predict that the Graco sprayer won't work and I'll have to buy a new one. If neither of those things happen, I predict a plague of locusts.

Monday, December 29, 2014

Painting the kitchen cabinets - part 2

Here we are, end of day 3, with not a lot to show. What we got done:
  • Primer coat 1 on kitchen cabinets
  • Holes drilled in drawers for hardware

What's left:
  • Everything else
The most important outstanding task is sanding and de-greasing the cabinet doors. I did some math today and realized that the doors are going to make or break my timetable, because each door requires 4 total coats with 16 hours drying time in between. My two-toned plan isn't tenable if I want to finish before I go back to work next week.

Sooo, I've decided to go with a single color for all the cabinets. I'll find another use for that dark greige custom color. I need to be able to spray all the doors at once so it takes a max of 4 days, and the only way I can do that is with a single color on top and bottom.

On a less tense note, here's my genius Tape & Drape technique (patent-pending):
Covered, ready to paint
Uncovered, ready for use
Covered, ready for painting
Uncovered, ready for use
I took a 9x12 plastic drop cloth and cut it into 4 parts. Each section was the perfect cabinet width and depth.

You're welcome, universe.

Sunday, December 28, 2014

Painting the kitchen cabinets - part 1

Two disclaimers right up front:
  1. I know I never posted "after" pictures of the backyard. (Heck, I'm not sure I posted all of the "befores"!) I've been meaning to...I will eventually! It's not a total transformation, but it's definitely a step in the right direction. 
  2. I won't be posting any pictures this time either! You're just going to have to read words. 
So, as the post title indicates, I decided to paint my kitchen cabinets! The driving factor was the ability to take this entire week and next off. Originally I thought that would be plenty of time, and now I'm fearful it will bleed into the following week/weekend or more. 

I've been reading up on this for 4-evah; since we bought the house. Pinterest is an amazing resource!! I read up on Chalk paints vs latex paints vs oil paints, different prep techniques (deglossers, sanders, the no-prep prep). I've studied at least 10 different step-by-steps on various home DIY websites, and well as some pro sites. I felt supremely confident two days ago. 

Not so much now. I attribute this in large part to my attempts at making a detailed plan. I wrote out explicit steps, bullets and sub-bullets. I left nothing assumed or undocumented. The problem was/is that I had an overly ambitious (aka delusional) timetable. I've never prepped a kitchen for painting before, and I'm now suspecting that my estimates for prepping (sanding, taping, deglossing, and generally everything you do before you ever pick up a brush) were grossly inaccurate. 

I started the project around 5pm yesterday, and my plan had me priming cabinet doors by the end of the night. It's now the end of day 2 (my first full-ish day, minus a previously scheduled hair appt and present-opening with the boys), and I still haven't started painting!

But I/we have accomplished a lot: Sanding cabinet boxes, doors removed and drilled for knobs, kitchen about 80% taped & draped. Tomorrow I'll post a picture of my innovative tape & drape solution - it's pretty impressive if I do say so myself (and I do).

What's left before commencing to paint: degrease interior cabinets, tape bottom slide out shelves, tape/cover floor, sand doors & drawers. I'm guessing all that will take another 4 hours?

Two unfortunate events so far:

  1. Yesterday when I went to buy paint, I told the Benjamin Moore guy I needed two gallons of Gettysburg Gray, when what I really wanted was Galveston Gray. He tried to get the paint color as close to Galveston Gray as possible, but it's ultimately a little browner than I'd prefer. (Sorry mom!) I hope I like it - at $49 a can I wasn't in a position to just write it off.
  2. Ryan accidentally dropped a door, and it came apart. However, this one actually turned into a positive (we think). We decided to paint the interiors of the cabinets for that door and its companion, and then order doors with glass instead. For a while there won't be any doors, but that's two less doors to paint! We also decided to leave the doors off the cabinets above the microwave space and just have open shelving. Two more doors off the painting list!! That's a total of 4 fewer doors to paint if you're keeping score at home. 
I'm nervous about painting because the sprayer freaks me out, but hopefully by my next post it'll be smooth sailing, er, painting. 

Saturday, October 18, 2014

Backyard progress - bed #1

That's a terrible post title but I've had these pictures for weeks so I just need to get them up because this weekend is the AFTER!!

Remember my angry Haikus about the Yahoo! Weather app? That was the day I was out in the backyard, working on the area to the left of the newest plantings just off the patio.

I was digging all the &#*@! rocks out of the bed up next to the house for about 3 hours. It's a tiny, tiny bed so I thought I was starting on the easy part. I quickly came to realize that the previous owners had used the rocks as mulch but hadn't put down any kind of cloth and also hosted Riverdance shows on that patch of earth, so the rocks were firmly pressed in. Digging them out was awful.

The Before. If this were a picture of the BEFORE Before you'd see a giant, ugly holly there too.

See all those #!$@% rocks?!?! I just piled them all against the bottom edge of the house. I'm sure there's a reason that's a bad idea.
The after Before.

Below you see a (mostly) clean bed ready for plants.
The before After...

And now, plants! Ta-da!!


For those of you keeping score at home, those are the Valentine roses I pulled up from the beds in the front. And now, almost 2 weeks later, they look even better because they're SO happy!

To the right (against the fence) is a Pennisetum 'Purple Prince'. It's likely going to get too big for that spot, but I love that plant.

To the left is a little peach tree called a Patio Peach! I don't know if it will ever produce fruit, but the leaves are a nice dark color rather than the typical green, so it will look lovely regardless if I don't kill it. And yes, that's the tag hanging off of it. I'm the Minnie Pearl of gardeners.

Today's project is laying down that brick edging I talked about! The bricks are all piled in the driveway, so wish me luck! 

Wednesday, October 8, 2014

What he said

The other day I was listening to an NPR interview with David Fincher, Director of the movie 'Gone Girl'.

He was asked a question about his films, and [I'm paraphrasing here] what percentage he'd redo if he could.

His answer captures exactly my gardening style, and unfortunately I'm to butcher this quote because I can't find the transcript anywhere: "95% of them. When I see it all strung together from beginning to end, now I know what it is."

Saturday, September 27, 2014

Haiku for the Yahoo! Weather App

Yahoo! Weather app
Stopped clocks are right more than you
Weather app you suck

Yahoo! Weather app
Uninstalling is too good
For this sucky app

Saturday, September 20, 2014

I had to start somewhere

I got tired of looking out the french doors to the back patio and seeing dirt...and fence. I may not know what I want to do with the rest of the back, but I was suddenly inspired to experiment in the one area I can't avoid looking at. I'm pleased with it:


I love this Crepe Myrtle - I think maybe it's Natchez? It has beautiful pendulous branches with white flowers. I'm going to plant another one parallel to it on the right side of the garden. Symmetry!


More angles:


I got it all in the ground last Sunday, just days before the great deluge. These pictures are post-deluge, which is why you don't see a lot of leaves on the ground: they're all washed up against the roots of the big oak tree. I plan to use them as a mulch for a bit, and then when I get real mulch just leave them under it to decompose. [I read things that say not to do that because it acidifies the soil, and messes with the pH too much for native plants like Crepe Myrtles? Argh, I don't know what the right answer is. To quote Barbie circa 1992: "Math is hard. Let's go shopping."]

Here's the outline to the left:

If you squint, the yard already looks better with the wood outline alone. Structure!


I laid the outline of the bed with some 2x4s left over from the patio overhang repairs. I plan to do it with brick, like danger garden! [I asked her via email about the edging and she very kindly shared the info. Then I told her I was going to Single White Female her garden, which in retrospect might freak a person out a little. Nothing in HER garden will die by my hands, so the similarity pretty much ends with me being a big fat copycat.]

I planted:

  • 2 of some elephant ear (dang it!!)
  • 6 Varigated Giant Liriope
  • 3 Cast Iron plant
  • 2 Giant Apostle Iris 'Regina'
  • 3 Canna (the 'Blueberry Sparkler' canna I pulled up from the front beds)
I know the canna will never bloom there but that's okay, I just want them for the darker foliage. The only ones likely to survive winter/come back are the liriope and Cast Iron plants, but it's worth rolling the dice.

Yes, I'm avoiding doing anything substantive with the ugliness of that entire left side of the garden yard. And the right side, for that matter. I just needed something back there to give me hope for the future.

Monday, September 8, 2014

My name is Wendy, and I'm an over-planter

It's 75% strategery, and 25% a really poor sense of dimensions. Or I might have that backwards.

That reminds me of a joke: why are women so bad a math? Punchline: because they're always being told that this [holds up hands spaced approximately 3 inches apart] is 6 inches.

I really do read the tags and carefully consider the size of each plant before I dig the hole. My issue is that I consider the size of each plant individually, rather than looking for overlapping diameters of growth. (I'm sure there's a gardenery technical term for that.)

You'd think an awareness of this would empower me with an ability to fix it, but I've come to the conclusion that it's part of my process. I will plant things too close to each other, let them fill in, and then decide what stays and what goes.

I love an exuberant garden and have an inability to leave empty spaces empty. It isn't because I don't appreciate the value of empty space, it's just because there are too many awesome plants.

Which brings me to today's garden activities. I've been trying to incorporate more dark foliage into my front bed. It gives a garden some gravitas and maturity, I think. To that end, I ordered a small tree called 'Ruby Falls' Weeping Redbud. Here's the picture from the online nursery:
Sooner Plant Farm, Ruby Falls Weeping Redbud
I know our neighbors keep commenting (positively) that my makeover has really opened up the front of the house, but I felt some height variation was in order too. So I planted this baby right here:


This necessitated moving those blue grasses around a bit, which needed to happen anyway. I also planted another 'Lafter' rose in that area (to replace the one that didn't make it back in August), and then I planted some Salvia guaranitica 'black and blue' on the edges next to the walkway.

I'm the least confident in the Salvia planting, because:

  1. That area gets a lot of sun, and my experience with those is that they like filtered sunlight
  2. They're ultimately too close to the rose
But right now everything looks lovely.

I planted another 'Lafter' rose (for a total of 3) over on the far right end, to replace the Atlas blue palm that died. (In my defense, I watered it the same as I did the Bismark Palm which is doing GREAT, so the blue palm can suck it.)

That picture isn't worth posting because the light was awful and my iPhone didn't do it justice, but I'll take a decent shot and post it just for record keeping. Rest assured, it's all likely too close together.

I have grand plans for that side of the house: I'm going to have that stupid giant green shrubbery pulled up and plant a Castor plant! I don't know how big it will get before winter kills it (it's an annual), but it will be a fun experiment. Let's pretend it will look like this:
Photo: Purdue University, Purdue Plant and Pest Diagnostic Laboratory

I planted another one here, just for kicks:
Forgive the ugly shadows, it was early afternoon


I moved the Agave 'Live Wires' closer to the walkway, but that thing will still overtake them if it gets as big as pictures indicate. Luckily it's easily killed if I don't like it.

THIS necessitated moving the poor germander 'Azure' yet again, but I think it's now in a permanent home. I moved another in that far right bed. I also moved the Saliva clevelandii, and I worry it will punish me for that. (I moved a lot of plants today, come to think of it....)

Ironically, my primary goal today was to plant all the irises I ordered from Schreiner's Iris Gardens. Of the 18 I ordered, I got a whopping 6 in the ground before I ran out of dirt. (I always underestimate the amount of dirt or mulch I'll need. See math joke above.)

Monday, September 1, 2014

Sunday, August 31, 2014

It's always darkest before the dawn...and in the shade garden

Last weekend (maybe the weekend prior?) some guys came through our 'hood and trimmed our neighbor's trees, and then offered to trim ours.

We ended up paying them to trim our trees a bit, and pull up a bunch of the shrubs in the back as well. I was dreading yanking out that Holly myself:


These pictures were taken by the seller's realtor, so trust me when I tell you that these pictures make it look waaaaay better than it actually was. It was a hot mess.

And now I have this, which is a hotter mess:


I left some of the reasonably decent looking trees, 99% of which are Crepe Myrtles. And of course the bazillion year old Oak with giant roots everywhere.

Don't get me wrong, I LOVE the Oak tree, I'm just not sure how to garden in its proximity. I will not, I repeat NOT, do that stupid thing people do where they plant a bunch of tiny plants in a circle around the base of the tree. It looks ridiculous. (It appears the former owners haphazardly - as they did all things - attempted that with some Mondo grass.)

I don't want grass at all. I want to do pea gravel and big flat pavers, with deep beds along the edges of the fence and house. This is my Pinterest page for the back.

Not sure how to put down pea gravel around all those big roots and not have it get washed toward the house in a good rain. And there are weird things going on over by the fence on the north fence side: I see tattered and half-buried landscape cloth to the left, and what appears to be wood edging from an aborted raised bed.

I might need to consult with someone on getting the back garden "foundation" set up properly before I dive into planting. Sigh. That part's not as much fun, but with Summer winding down it's the smarter move. I'd love to get enough settled that I could get a couple of trees in the ground, though. I'm thinking about three Texas sun tolerant Japanese Maples as my anchors. Apparently such things exist....

Sunday, August 24, 2014

This post is called 'Before and After', or 'Reason #437 I'm a terrible blogger'

Reason #2 is that I take terrible pictures. Reason #437 is that I never take 'Before' pictures, or if I do I forget to post them! But the good news is:

  1. I found the pictures from the original listing, so better late than never
  2. I decided to stick with the yellow color in the sunroom. For now, anyway.
Here's the sunroom, since that was on the top of the to-do list for the weekend.
Before: the blandest room in all of Blandville
What this photo can't possibly convey is how ugly the tile is, and how much the windows need to be replaced. (You know, the windows hidden behind the gawd awful curtains on brass curtain rods.) Mind you, the room hasn't looked quite like that since the day we got the keys: the first thing I did was to pull down all the window treatments.

The tile will be replaced someday, and I need to sew a cushion cover for the bench, but this is certainly an improvement:


It kind of makes me want to repaint the dining area, which is right next to it...but I'm going try to stifle that urge for as long as I possibly can.

So now on to the living area and the boys' playroom! (These will be more dramatic due to the addition of hardwood floors and removal of popcorn ceiling, but I'm taking credit for having done all that since I'll be paying it off for the next year....)
Before
After (this caption is probably superfluous)

Before
(Bonus shot of Ollie looking for his squeaky mouse.)
 

View from the informal (kitchen) dining area
If you look closely, you can see the unpainted edges next to the ceiling; I couldn't reach any higher with a paint brush on our tallest ladder. Someday I'll address that....

How about that carpet, huh? And note the strip of tile in between the formal dining area and the living area. It matched the kitchen/informal dining area, so it had that going for it.
Before
(Again: Ollie the photobomber)

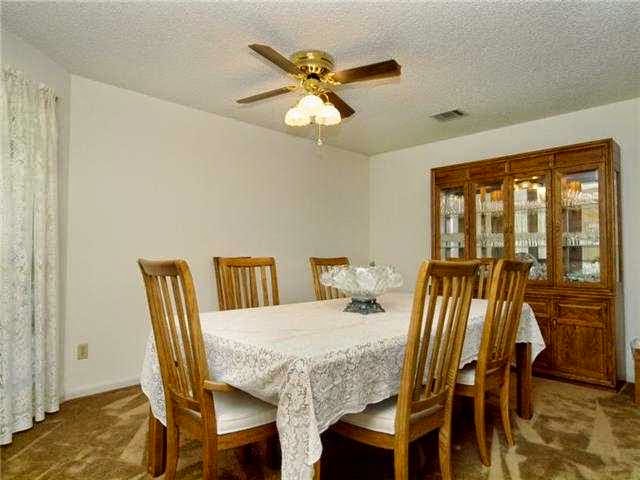
Before: formal dining area
Now: a play area for the boys
I have to give the seller's realtor this: she took photos that look bright and clean, and the home looks ginormous! But despite my inept photography skills I think there's still an obvious improvement.

You might be wondering what's going on with the fireplace. As you can tell from the before and after comparison, I painted it white and that made a huge difference: it went from looking country to looking more modern and like an actual feature of the room. 
(Full disclosure: I haven't even painted it yet, I've only primed it.)
Those shapes in the middle are some rudimentary fretwork designs (just cut outs of paper). 

I agonized over what to do with that center space: it's heavily textured wall, and I didn't like the look of either a mirror or a picture. I'll need to get some very thin balsa wood cut to size, nail it up there, paint it, and then apply the trim in whatever pattern I settle on.

Here's what gave me the idea:
Image: Burnham Design (http://www.burnhamdesign.com)
Pretty amazing, huh? Here's something a little closer to what I envision:
(Sorry for the poor-quality photo)
Both rooms need the ceiling fans replaced someday, but we'll get there.