Pages

Thursday, January 22, 2015

I almost forgot to post about this: I conquered the caulk!!

I've been intimidated by caulking since I tried to recaulk the bathtub in my old house 10+ years ago. It was a disaster.

I knew I needed to caulk the gaps between the upper kitchen cabinets and the ceiling. They were there before I painted; a remnant of the popcorn ceiling removal (again, those guys were slackers).

After the cabinets were painted it was even more obvious:


Behold the beauty of my caulking!


I read a lot on Pinterest about how to do it well. The secrets:

  1. Cut the hole as small as you possibly can. I didn't even cut all the way to the 1/8 mark and it was plenty big.
  2. Don't use a wet finger. Wet your finger with water, blot it once on a damp paper towel, and then smooth out the caulk bead. Wipe off excess caulk, wet your finger, and repeat the process.
Yay for me!! (And my kitchen. And Pinterest.)

Wednesday, January 21, 2015

Kitchen win

This arrived today, and I am thrilled beyond words:


It's the custom rug I mentioned ordering in this post. It's beautiful, and I'm not just saying that because it covers the blue tile. To paraphrase The Dude "It really pulls the room together."

It slightly offsets the minor setback with the oak board I've been working on for the fireplace.

I discovered that it wasn't cut evenly, and it's approximately 1/4 inch higher on the right side. (You can kind of tell if you look closely.) And it isn't all at one end, it's a little off both at the top and bottom. So now I need to get a hand planer I guess? Argh.

I got a deal on Angie's List for 3 hours of handyman work, so having them mount this is my primary objective. If time permits, turning the door to this cabinet into a pullout is my second need:

Sunday, January 18, 2015

In the meantime...the fireplace

To kill time waiting for gardening season (woohoo!) I'm knocking out other projects inside the house. I finally initiated some movement on the fireplace finishout (I don't know what to call it??)

You might recall from an earlier post that I wanted to do something like fretwork in the center area:


I screwed up the courage to get a piece of 1/4" oak, cut to size, and then use my Buck Bros miter box/Back saw to start the design. That was a fantastic purchase: inexpensive (maybe $12?) and gets the job done. It wouldn't work with thicker or denser pieces of wood, but that's not what I needed it for: hooray for the right tool for the right job!

I'm feeling pretty good so far:


Why yes, I AM sawing those pieces inside the house, right on the carpet. After 2+ weeks of working on cabinet doors in that freezing garage, I'm done being uncomfortable. I'm a grownup (mostly), and I can do what I want!

Today I'm going to glue the pieces on using wood glue, caulk it in gaps and on the edges, then prime it with the leftover Primer spray cans.

I'll try to tackle mounting it to the wall next weekend, maybe? That intimidates me because:
  1. The wall is textured, which may make it harder for the Liquid Nails to adhere, and I don't want to sand in the house.
  2. The wall covering a brick fireplace, and if I use nails to hold it until the Liquid Nails dries, I don't know how long a nail is too long? 1"? 3/4"? I'm envisioning nails sticking out of the wall like Pinhead from Hellraiser. *shudder*

Painting the kitchen cabinets - 99.2% done!

I submit to you the lower cabinet doors in all their painted glory:


I still need to address the cabinet we're converting into a pull-out trash bin. (Hence, the 92.8% completion estimate.) I'll post some pictures of that too.

I ordered a custom-sized rug from sisalrugs.com, to cover the blue tiles on the floor. It measures 4'1" x 8'10", and there's no standard sized rug that would fit that space without looking a little weird (a 6x9 would end up going right up to the cabinets on both sides). The awesome thing about that site is that they sell remnants in odd sizes at radically discount prices, and they'll finish them out with cotton edging for you! I got the perfect size at a fraction of the normal cost - can't wait until it gets here!! If I love it I'll get a matching one to cover the blue tile in the dining area.

Once I do something about the backsplash I'll post a full view before and after comparison shot. So close!!

Saturday, January 10, 2015

Painting the kitchen cabinets - 2 things (mini post)

#1 - I love, love having drawers again:


#2 - I've decided I love my accidental gray color so much that I'm going to paint all the doors in the house that color.

But not this weekend.

Painting the kitchen cabinets - 2 steps forward, one (tiny) step back


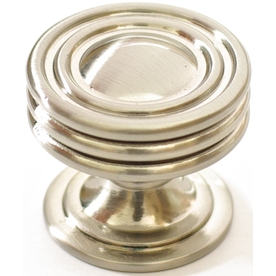
We have doors!! See those knobs?? Yay! They're the Allen + Roth satin nickel knobs from Lowe's and I love them. They have a nice weight to them.
allen + roth 1.25-in Satin Nickel Round Cabinet Knob

Unfortunately I couldn't put them on the drawers because the screw/post is too short, so I'll be making a trip to Home Depot or Lowe's this weekend to look for longer ones.

Last night I applied the 2nd coat of paint to the backs of the lower cabinet doors, and we installed the new Acona Stainless Steel vent hood. We're struggling a bit with the flue (?) that vents the air out of the vent hood, so we still have the range in the middle of the kitchen floor.


I should have taken a picture of the during: I finally taped gauze pads all along the edges of the cabinets because Ryan kept accidentally banging them with the vent hood every time he put it in and took it out. Not something he could help because it's heavy/awkward, but there are a few dings I'll have to touch up. [At one point he flung open the cabinet door above the range, where the flue is housed, and the lovely new knob banged into the door on the right. I felt my heart in my throat for a moment but nothing got damaged that time. I learned my lesson and taped over the knob temporarily, but the smart move would have been to leave those doors off until the vent was installed.]


Tonight is coat 1 on the front side, tomorrow coat 2, and then we wait for them to dry/cure so we can re-hang!

Wednesday, January 7, 2015

Painting the kitchen cabinets - a breath of fresh air

The doors and drawers aren't back on yet, but this was the status as of Sunday night:


You probably can't quite tell, but I also painted the walls White Dove (flat). That's when I really let out the breath I didn't know I'd been holding since we moved in. The color had been a pinkish beige-ish color, painted to match the ugly tile (of course).

I just go into the kitchen, turn on all the lights, look around and sigh happily, then turn the lights off again and leave. Rinse and repeat.

Then last night Ryan was sweet and installed a light fixture I'd purchased months ago:


It replaces the loathesome nipple fixture (my term for it):


Tomorrow night we will install knobs on drawers and upper doors, and re-hang the upper cabinet doors! Then I prime the lower cabinet doors, and if everything goes as planned (ha!) I'm finished painting by Sunday!!

Saturday, January 3, 2015

Painting the kitchen cabinets - it's really happening!

Bottom cabinet boxes: done!

Drawers: done! (I think. Need to make sure the 2nd coat really covered, as my 1st was very light.)

Upper cabinet boxes: 75% done!

Upper cabinet doors: 50% done!


Saturday plan:
  • Finish upper cabinet boxes
  • Paint 1st coat on front side of upper cabinet doors (woohoo!)
  • Paint walls (White Dove also, in Regal flat)
  • Touch up paint on dining area walls
Sunday plan:
  • Paint 2nd coat on front side of upper cabinet doors (woohoo!)
  • Caulk where cabinets meet ceiling
  • Spray paint hardware
I'm still debating what to do about the backsplash. I feel like the dingy white and dated blue are just going to drag my newly refurbished kitchen down. 

I am strongly considering painting the backsplash tiles. That's right, you read that correctly. I'd really rather put up wainscoting/beadboard, but I have neither the time nor the money to do that. I think the Advance paint will stick? I did a test spot on the floor. Hmm...